28. Color Classify

Color Classify

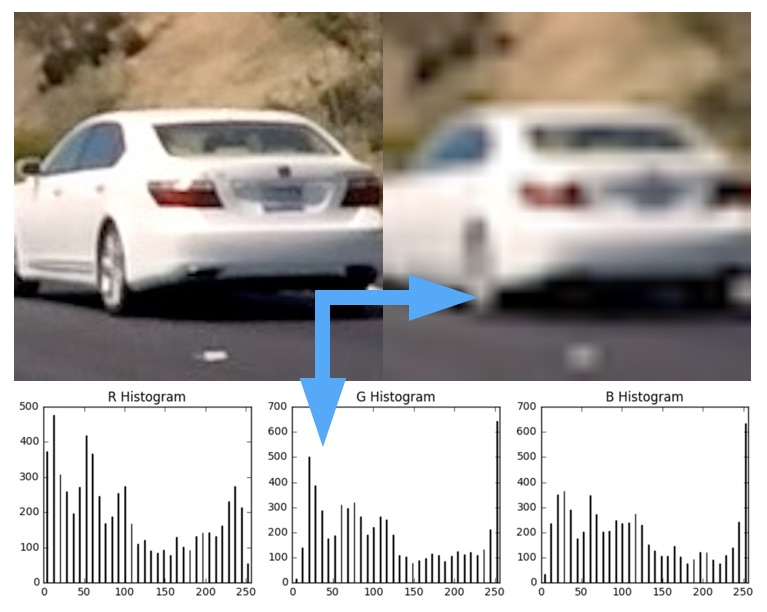
Now we'll try training a classifier on our dataset. First, we'll see how well it does just using spatially binned color and color histograms.

To do this, we'll use the functions you defined in previous exercises, namely, bin_spatial() , color_hist() , and extract_features() . We'll then read in our car and non-car images, and extract the color features for each.

All that remains is to define a labels vector, shuffle and split the data into training and testing sets, scale the feature vectors to zero mean and unit variance, and finally, define a classifier and train it!

Our labels vector y in this case will just be a binary vector indicating whether each feature vector in our dataset corresponds to a car or non-car (1's for cars, 0's for non-cars). Given lists of car and non-car features (the output of extract_features() ) we can define a labels vector like this:

import numpy as np
# Define a labels vector based on features lists
y = np.hstack((np.ones(len(car_features)), 
              np.zeros(len(notcar_features))))

Next, we'll stack our feature vectors like before:

# Create an array stack of feature vectors
X = np.vstack((car_features, notcar_features)).astype(np.float64)

And now we're ready to shuffle and split the data into training and testing sets. To do this we'll use the Scikit-Learn train_test_split() function, but it's worth noting that recently, this function moved from the sklearn.cross_validation package (in sklearn version <=0.17) to the sklearn.model_selection package (in sklearn version >=0.18).

In the quiz editor we're still running sklearn v0.17, so we'll import it like this:

from sklearn.cross_validation import train_test_split
# But, if you are using scikit-learn >= 0.18 then use this:
# from sklearn.model_selection import train_test_split

train_test_split() performs both the shuffle and split of the data and you'll call it like this (here choosing to initialize the shuffle with a different random state each time):

# Split up data into randomized training and test sets
rand_state = np.random.randint(0, 100)
X_train, X_test, y_train, y_test = train_test_split(
    X, y, test_size=0.2, random_state=rand_state)

Now that we have split into training and test sets, we can scale our features. It's important to do the scaling after splitting the data, otherwise you are allowing the scaler to peer into your test data!

from sklearn.preprocessing import StandardScaler
# Fit a per-column scaler only on the training data
X_scaler = StandardScaler().fit(X_train)
# Apply the scaler to both X_train and X_test
scaled_X_train = X_scaler.transform(X_train)
scaled_X_test = X_scaler.transform(X_test)

#### Warning: when dealing with image data that was extracted from video, you may be dealing with sequences of images where your target object (vehicles in this case) appear almost identical in a whole series of images. In such a case, even a randomized train-test split will be subject to overfitting because images in the training set may be nearly identical to images in the test set. For the subset of images used in the next several quizzes, this is not a problem, but to optimize your classifier for the project, you may need to worry about time-series of images!

Now, you're ready to define and train a classifier! Here we'll try a Linear Support Vector Machine. To define and train your classifier it takes just a few lines of code:

from sklearn.svm import LinearSVC
# Use a linear SVC (support vector classifier)
svc = LinearSVC()
# Train the SVC
svc.fit(scaled_X_train, y_train)

Then you can check the accuracy of your classifier on the test dataset like this:

print('Test Accuracy of SVC = ', svc.score(scaled_X_test, y_test))

Or you can make predictions on a subset of the test data and compare directly with ground truth:

print('My SVC predicts: ', svc.predict(scaled_X_test[0:10].reshape(1, -1)))
print('For labels: ', y_test[0:10])

Play with the parameter values spatial and histbin in the exercise below to see how the classifier accuracy and training time vary with the feature vector input.

Start Quiz:

import matplotlib.image as mpimg
import matplotlib.pyplot as plt
import numpy as np
import cv2
import glob
import time
from sklearn.svm import LinearSVC
from sklearn.preprocessing import StandardScaler
# NOTE: the next import is only valid 
# for scikit-learn version <= 0.17
# if you are using scikit-learn >= 0.18 then use this:
# from sklearn.model_selection import train_test_split
from sklearn.cross_validation import train_test_split

# Define a function to compute binned color features  
def bin_spatial(img, size=(32, 32)):
    # Use cv2.resize().ravel() to create the feature vector
    features = cv2.resize(img, size).ravel() 
    # Return the feature vector
    return features

# Define a function to compute color histogram features  
def color_hist(img, nbins=32, bins_range=(0, 256)):
    # Compute the histogram of the color channels separately
    channel1_hist = np.histogram(img[:,:,0], bins=nbins, range=bins_range)
    channel2_hist = np.histogram(img[:,:,1], bins=nbins, range=bins_range)
    channel3_hist = np.histogram(img[:,:,2], bins=nbins, range=bins_range)
    # Concatenate the histograms into a single feature vector
    hist_features = np.concatenate((channel1_hist[0], channel2_hist[0], channel3_hist[0]))
    # Return the individual histograms, bin_centers and feature vector
    return hist_features

# Define a function to extract features from a list of images
# Have this function call bin_spatial() and color_hist()
def extract_features(imgs, cspace='RGB', spatial_size=(32, 32),
                        hist_bins=32, hist_range=(0, 256)):
    # Create a list to append feature vectors to
    features = []
    # Iterate through the list of images
    for file in imgs:
        # Read in each one by one
        image = mpimg.imread(file)
        # apply color conversion if other than 'RGB'
        if cspace != 'RGB':
            if cspace == 'HSV':
                feature_image = cv2.cvtColor(image, cv2.COLOR_RGB2HSV)
            elif cspace == 'LUV':
                feature_image = cv2.cvtColor(image, cv2.COLOR_RGB2LUV)
            elif cspace == 'HLS':
                feature_image = cv2.cvtColor(image, cv2.COLOR_RGB2HLS)
            elif cspace == 'YUV':
                feature_image = cv2.cvtColor(image, cv2.COLOR_RGB2YUV)
        else: feature_image = np.copy(image)      
        # Apply bin_spatial() to get spatial color features
        spatial_features = bin_spatial(feature_image, size=spatial_size)
        # Apply color_hist() also with a color space option now
        hist_features = color_hist(feature_image, nbins=hist_bins, bins_range=hist_range)
        # Append the new feature vector to the features list
        features.append(np.concatenate((spatial_features, hist_features)))
    # Return list of feature vectors
    return features


# Read in car and non-car images
images = glob.glob('*.jpeg')
cars = []
notcars = []
for image in images:
    if 'image' in image or 'extra' in image:
        notcars.append(image)
    else:
        cars.append(image)

# TODO play with these values to see how your classifier
# performs under different binning scenarios
spatial = 32
histbin = 32

car_features = extract_features(cars, cspace='RGB', spatial_size=(spatial, spatial),
                        hist_bins=histbin, hist_range=(0, 256))
notcar_features = extract_features(notcars, cspace='RGB', spatial_size=(spatial, spatial),
                        hist_bins=histbin, hist_range=(0, 256))

# Create an array stack of feature vectors
X = np.vstack((car_features, notcar_features)).astype(np.float64)

# Define the labels vector
y = np.hstack((np.ones(len(car_features)), np.zeros(len(notcar_features))))

# Split up data into randomized training and test sets
rand_state = np.random.randint(0, 100)
X_train, X_test, y_train, y_test = train_test_split(
    X, y, test_size=0.2, random_state=rand_state)
    
# Fit a per-column scaler only on the training data
X_scaler = StandardScaler().fit(X_train)
# Apply the scaler to X_train and X_test
X_train = X_scaler.transform(X_train)
X_test = X_scaler.transform(X_test)

print('Using spatial binning of:',spatial,
    'and', histbin,'histogram bins')
print('Feature vector length:', len(X_train[0]))
# Use a linear SVC 
svc = LinearSVC()
# Check the training time for the SVC
t=time.time()
svc.fit(X_train, y_train)
t2 = time.time()
print(round(t2-t, 2), 'Seconds to train SVC...')
# Check the score of the SVC
print('Test Accuracy of SVC = ', round(svc.score(X_test, y_test), 4))
# Check the prediction time for a single sample
t=time.time()
n_predict = 10
print('My SVC predicts: ', svc.predict(X_test[0:n_predict]))
print('For these',n_predict, 'labels: ', y_test[0:n_predict])
t2 = time.time()
print(round(t2-t, 5), 'Seconds to predict', n_predict,'labels with SVC')